
Google Maps is the world's favorite mapping and navigation app for a good reason. It's free, easy to use and reliable. But what if you need to do more than get from A to B, and plan a route with multiple addresses — say for a road trip? Google Maps can do multi-stop route plans as well!
In this tutorial, we'll show you:
- Step-by-step instructions for how to use Google Maps to plan a route with multiple addresses, up to 10 stops.
- For routes longer than 10 stops, we'll also show you how to use Google’s My Maps.
Neither Google Maps nor My Maps does any kind of route optimization, so if you have a lot of stops you should know that you probably won’t get the most efficient route this way. If efficiency matters to you, you probably want to consider route optimization software.
If you need to plan a delivery route, you’ll probably need a slightly more advanced approach to using Google route planner — our recommended method is laid out in our Google Route Planner for Deliveries post.
Tutorial: How to use Google Maps as a multi stop route planner
Here’s how to use Google Maps to create a route with multiple locations. You CAN plan a route using the Google Maps app on your Android or iOS smartphone, but we recommend route planning on your desktop instead. On the desktop it’s easy to see your whole route at once, whereas on a phone it’s easy to lose track, accidentally click the wrong thing, and have to start all over again.
So, open up your browser and let’s dive right in!
1: Go to google.com/maps
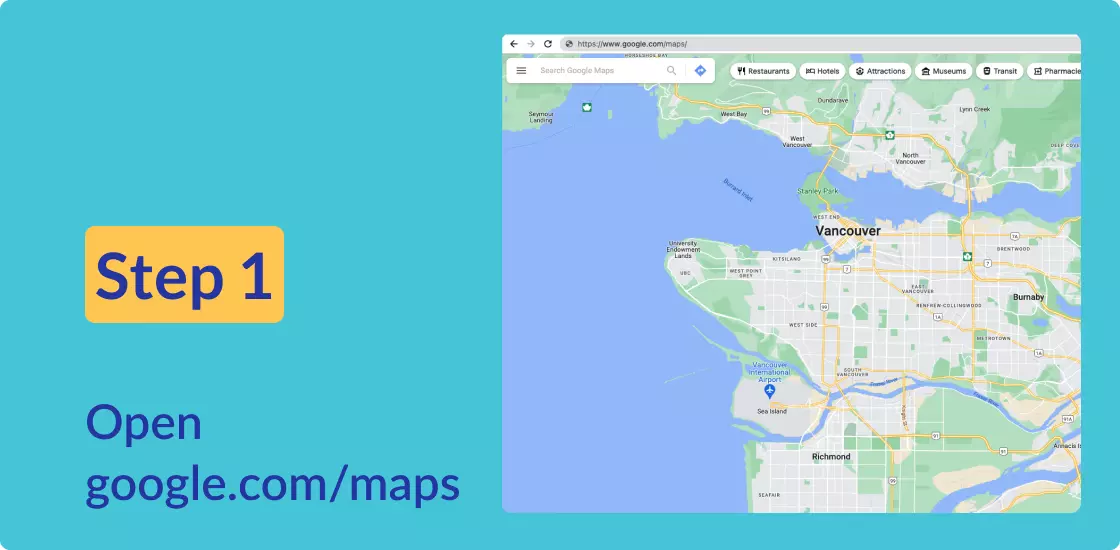
Simply open your browser and type google.com/maps in the address bar.
2: Enter a starting address
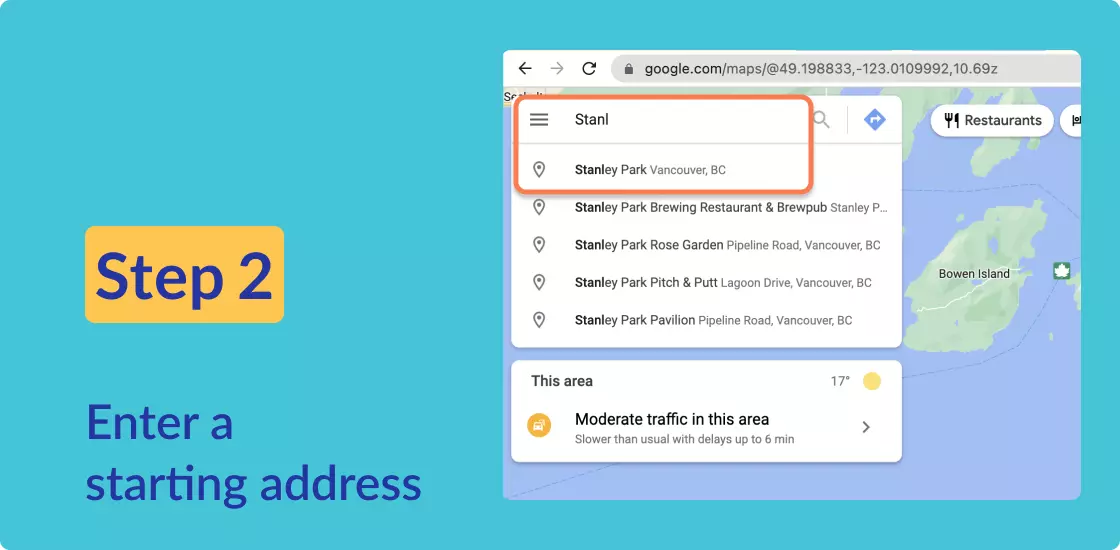
Start typing the address you want to visit as your first destination into the “Search Google Maps” bar. Google will pop up a list of suggestions. If you see the one you want, click it. If not, keep typing until you see the right destination — just check that you’re in the right city!
Alternatively, you can click anywhere on the map to set your first stop.
3: Click on Directions
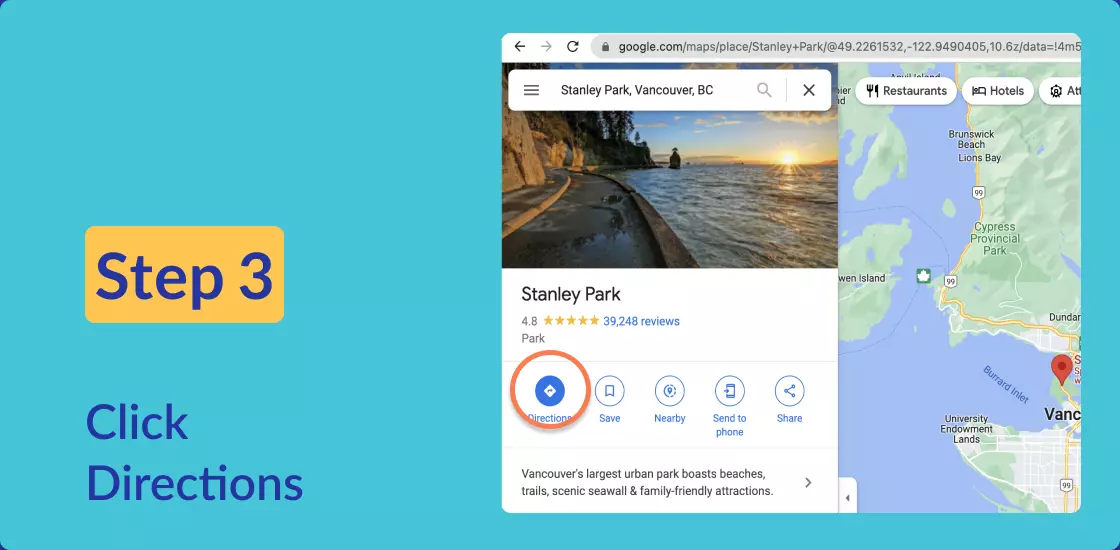
Now that you have your first address set, click on the “Directions” button to open the route panel.
4: Add another address
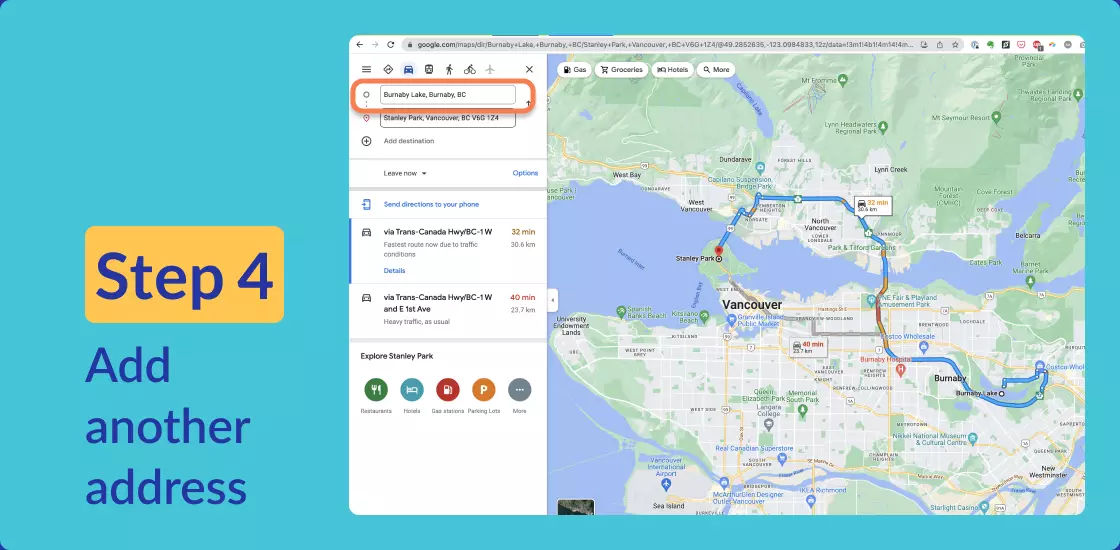
You’ll notice that Google uses this step to set your starting point, rather than your next destination. If your route is going to be starting from home, or wherever your current location is, just click in the box to confirm “your location”, and your route will be created instantly.
If your route will be starting somewhere else, add that address and enter – and again, Google will automatically create a route between the two places for you. At this stage, when there are just two destinations, there’s a very good chance you’ve also got the fastest route. Point to point navigation with estimated travel time and live traffic updates is where Google Maps really shines.
5: Click “Add destination”
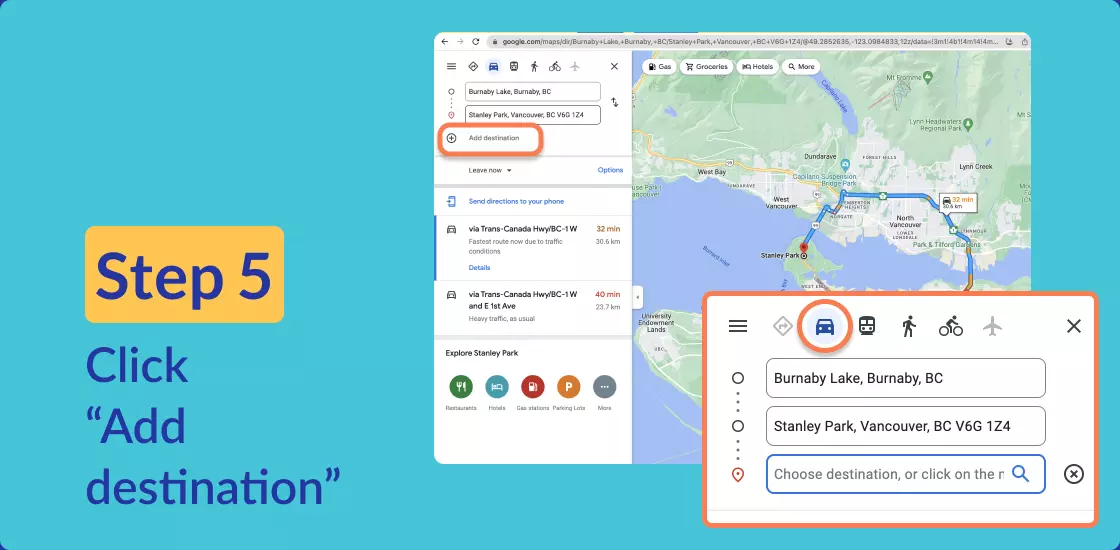
Click on the “Add destination” button. A new box will appear ready for you to enter your next address.
Now is a good time to check that you’ve chosen the right transport mode. If you’re traveling by car, make sure the car icon is highlighted in blue. If you’re planning a walk or bike ride, choose those modes instead. The public transit mode unfortunately doesn’t allow you to add multiple destinations.
6: Keep adding destinations
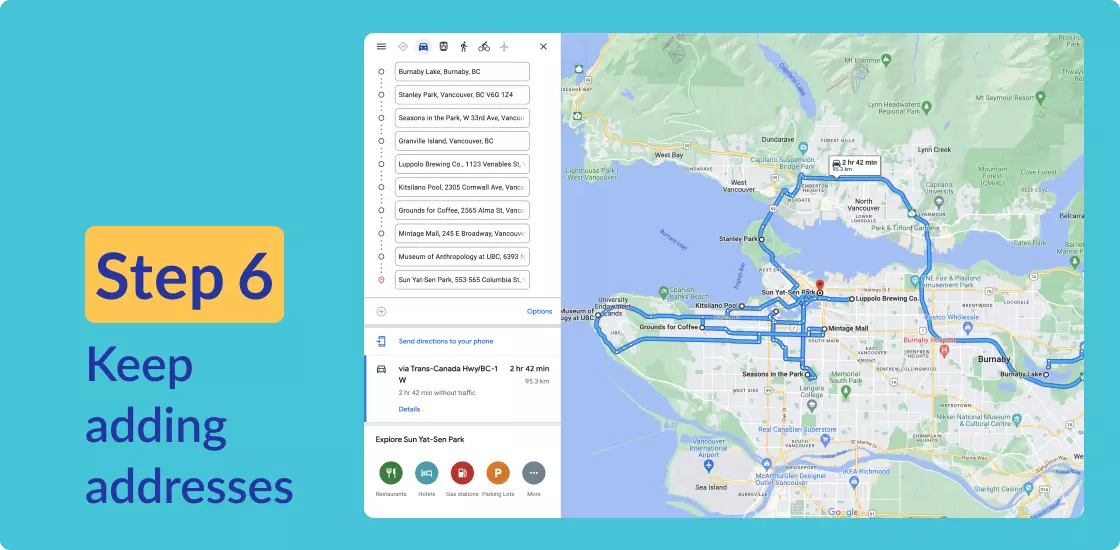
Now just keep adding destinations until you’re done, or until you hit the limit of 10 stops. (If you need to plan a route longer than 10 stops, have a look at our advanced instructions further down this page).
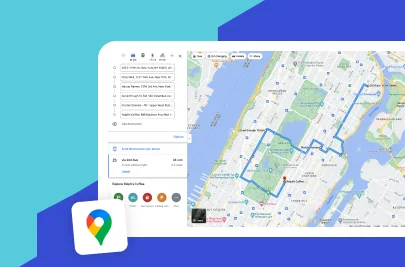
That’s great, right? You have a route! Except, you’ll notice that this route looks like a mess of tangled spaghetti. Google has kept your addresses in exactly the same order you entered them, which is not the same as the most efficient order. In the next step, you’ll see how to create a shorter, more sensible route.
7: Rearrange your stops
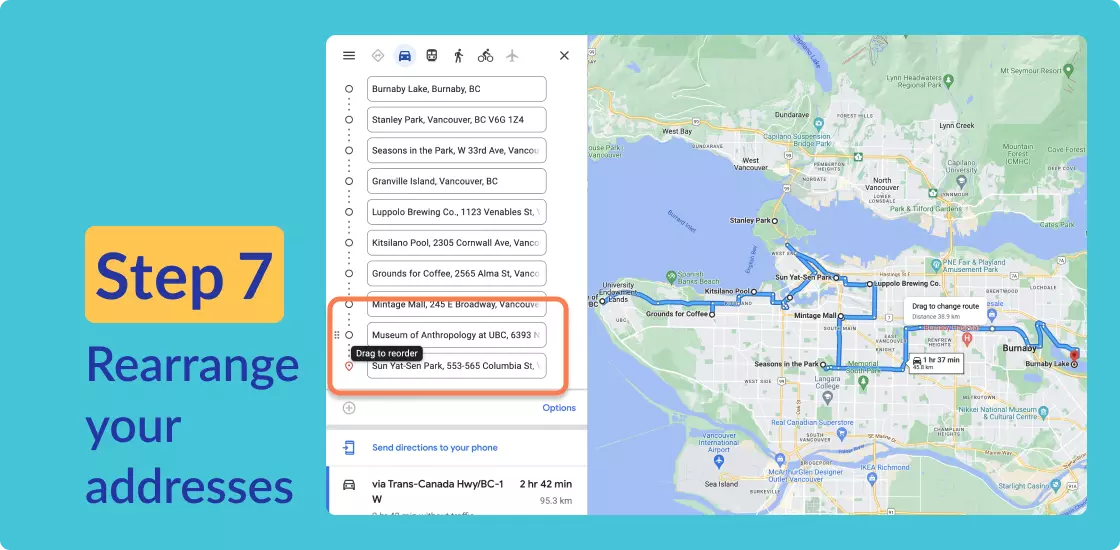
If you hover your mouse over one of your addresses, you’ll see an icon with six dots and a “Drag to reorder” note. Click and hold on the dots to drag any address to a new place in the list.
You can choose any order that makes sense to you. We’ve chosen to start with the address furthest to the west, and then finish in the east. You’ll notice that our re-ordered route is a lot simpler and avoids a long detour that goes over two bridges. The result is that instead of spending 2hr 42mins on the road, we’re only spending 1hr 37 mins — we’ve saved more than an hour! The difference won’t always be so dramatic, but you can definitely save a lot of time this way.
8: Send your route to a phone
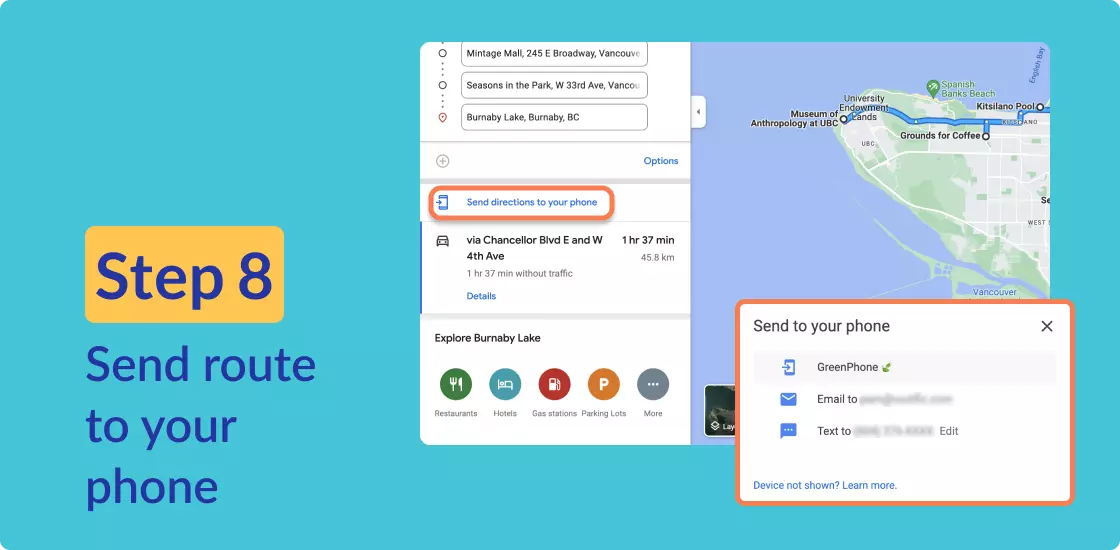
Now it’s easy to send these directions to your mobile device so you can get on the road to your final destination! Click on “Send directions to your phone” and choose an option from the popup menu so you can get directions.
9: Open the route on your phone
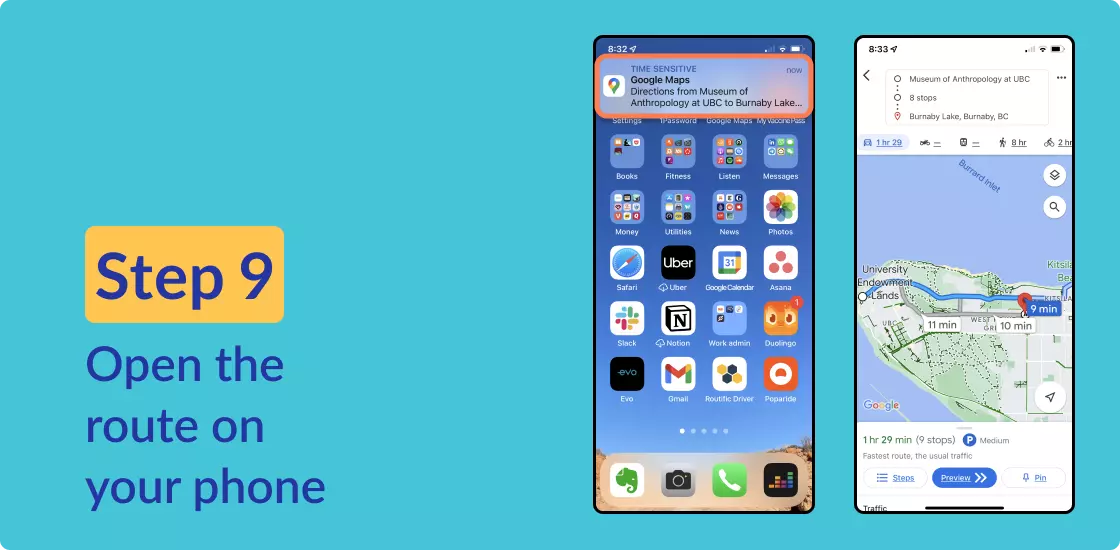
Now click the notification that will appear on your phone screen, and your route will pop up ready to navigate!
If you’re already at your starting point, the blue button will say “Start” and you can start your trip anytime. If you’re somewhere else, it will say “Preview” until you’re in position to go.
How to share a Google Maps route with someone else
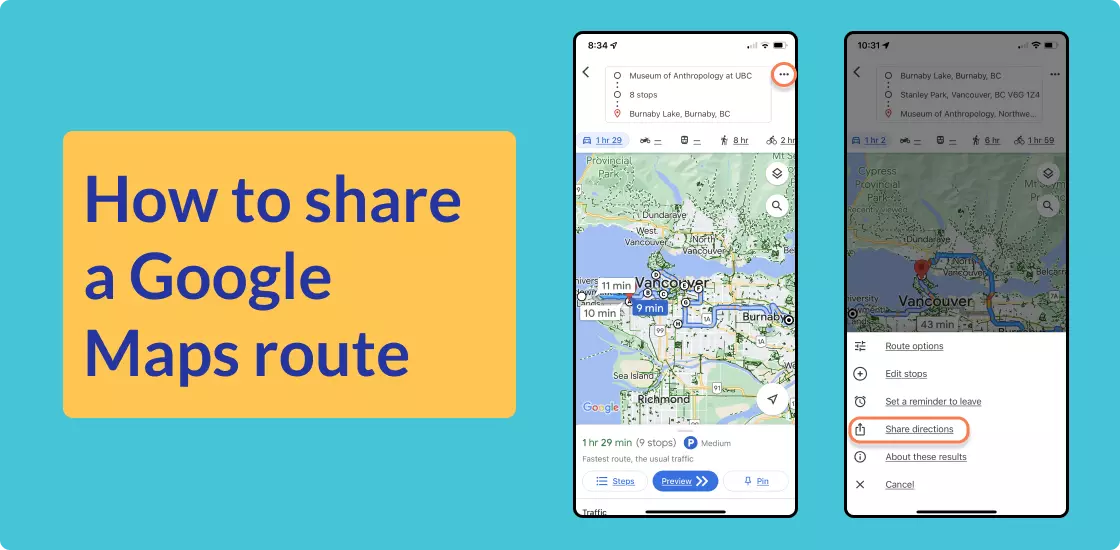
To share a Google Maps route with someone else, you need to do it from your phone. Just click the ⋯ “kebab” menu at the top right hand corner of your screen and then choose “Share directions” in the popup menu.
How to plan multi-stop routes with Google My Maps
Google’s My Maps is an interesting free alternative to Google Maps route planner. It’s best for when you’re planning a road trip or traveling to a new destination and you want to plan activities or visits ahead of time. You can pin up to 2,000 locations, and add extra information like notes, custom icons and colors. This makes it great for mapping attractions or pit stops when you’re planning a road trip.
The disadvantages are that My Maps is not great at actual route planning, and you definitely won't get optimized routes. You also still have to work in groups of 10 locations at a time, and it doesn’t give live driving directions. But it’s still worth knowing how to do it!
1: Open My Maps
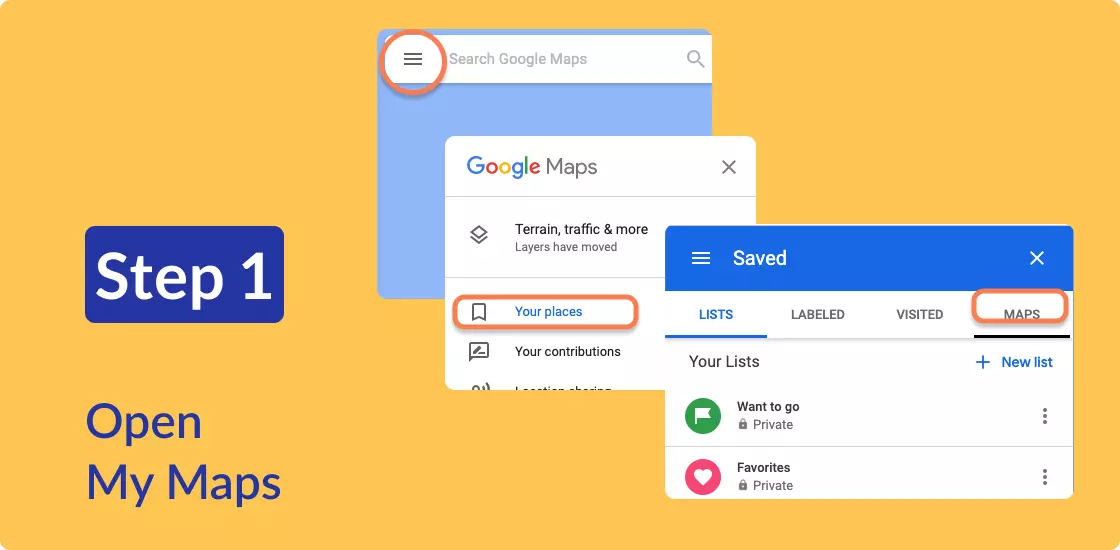
There are two ways to open My Maps:
- Open My Maps directly from this link
- Find it from Google Maps by clicking on the ‘hamburger’ menu icon ☰, then Your Places > Maps > Create a New Map.
2: Add stops
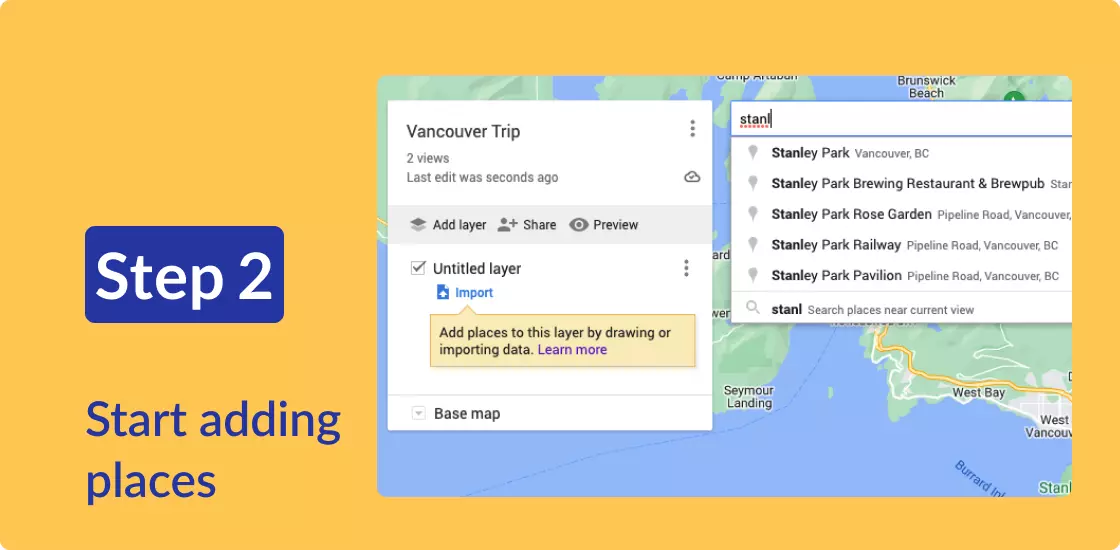
Once you have your map set up, just click in the search bar, start typing the name of the place you want, and select it from the pop-up list to add it to your map. You can also click on any existing place on the map to add it.
You can add up to 2,000 separate places to each map you create in My Maps. That makes it a great choice if your route is going to exceed the Google Maps limit of 10 stops.
3: Start drawing a route

Now it’s time to plan some routes! One of the neat things about My Maps is the ability to create separate driving, walking and cycling routes on the same map, so to illustrate we’re going to start with a cycling route. Click on the “Draw a line” icon at the top of your screen, and then choose the type of route you want to create. Click on your starting point, then on the next place you want to go, and My Maps will draw the route for you.
4: Add places to your route

Notice on the left hand side of your screen that My Maps has created a new layer containing your route. Click “Add destination” to keep adding stops along your route. If you’ve chosen a cycling route, you’ll see cycle paths highlighted in green.
5: Create a new route using a different mode

Now we follow exactly the same steps to create a driving route. In the picture below you’ll see we have two completed routes in two different layers, one for cycling and one for driving.
6: View route details
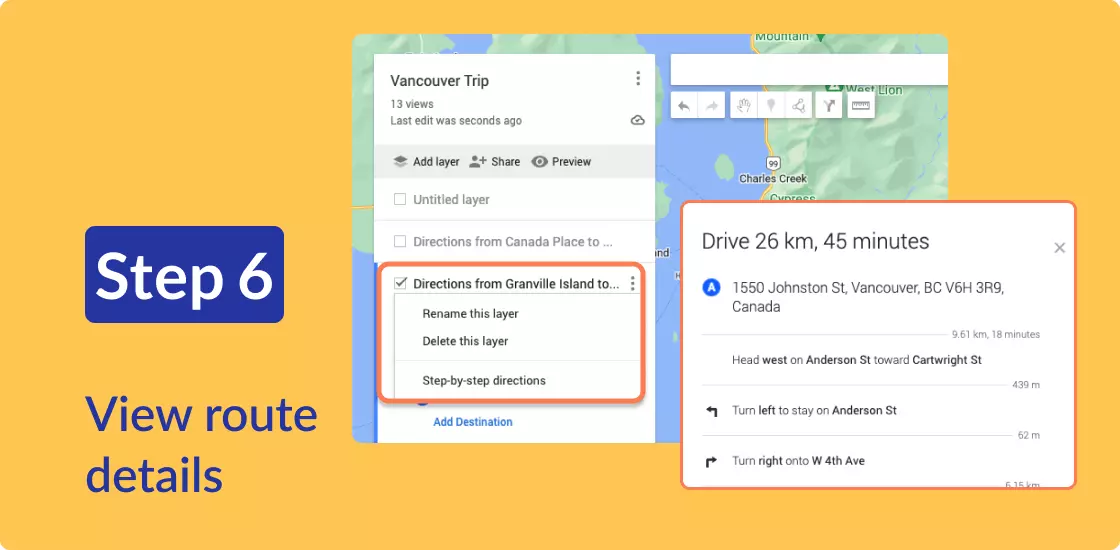
Unlike Google Maps, My Maps doesn’t display time and distance information right on the route. To see this, click the three dots next to your layer name and choose “Step-by-step directions”. That will pop up a detailed breakdown of your route, with a time and distance estimate at the top.
If things start getting complicated, you can hide or show layers using the checkboxes next to their names.
There’s no need to save these routes, by the way – they've been saved automatically, and you can come back to your map anytime.
7: Share your map
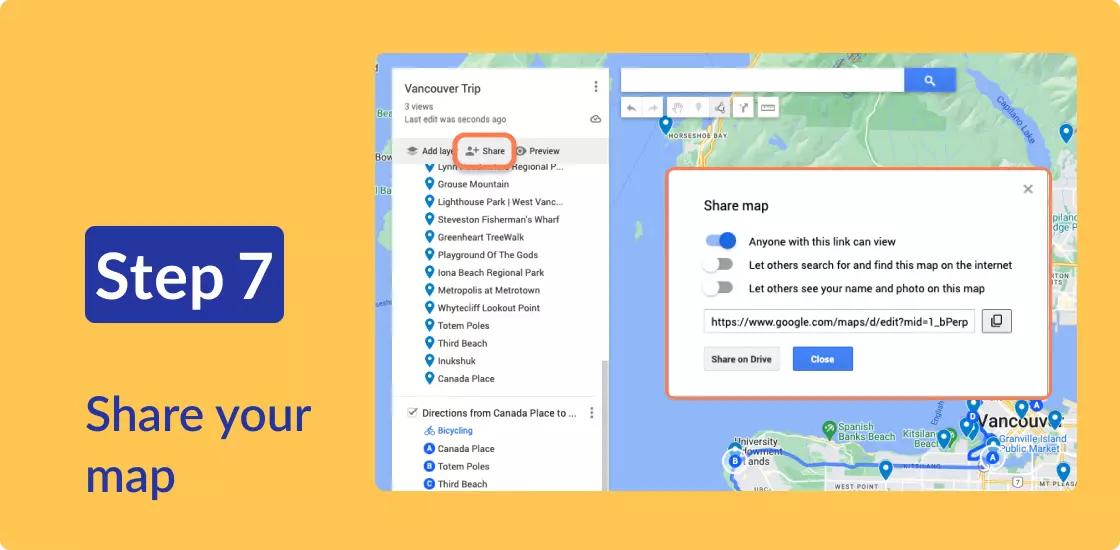
Sharing your map is easy. Once you’ve set up all your places, just click on “Share”, choose the level of sharing you want and copy the resulting URL. “Anyone with this link can view” is the easiest (but don’t put your home or your kids’ school on this map!) Now you can share it with anyone via email or text.
8: View your map on your phone
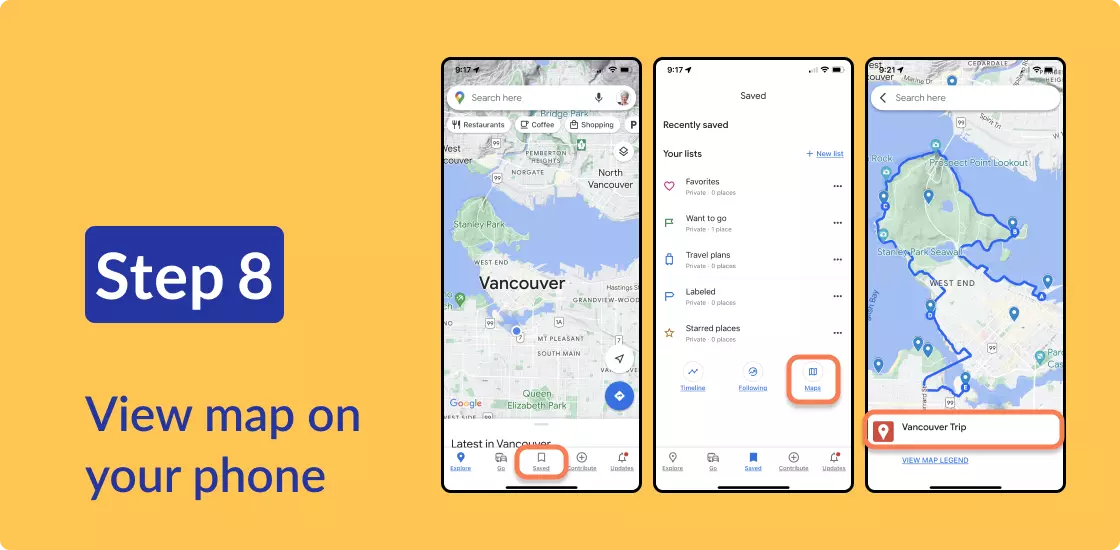
To use the map on your own phone, just open Google Maps and click on “Saved” at the bottom of your screen. Now click on “Maps” and finally on the map you’ve just created. You’ll see all the stops you’ve saved and the routes you’ve created.
9: Navigate your route
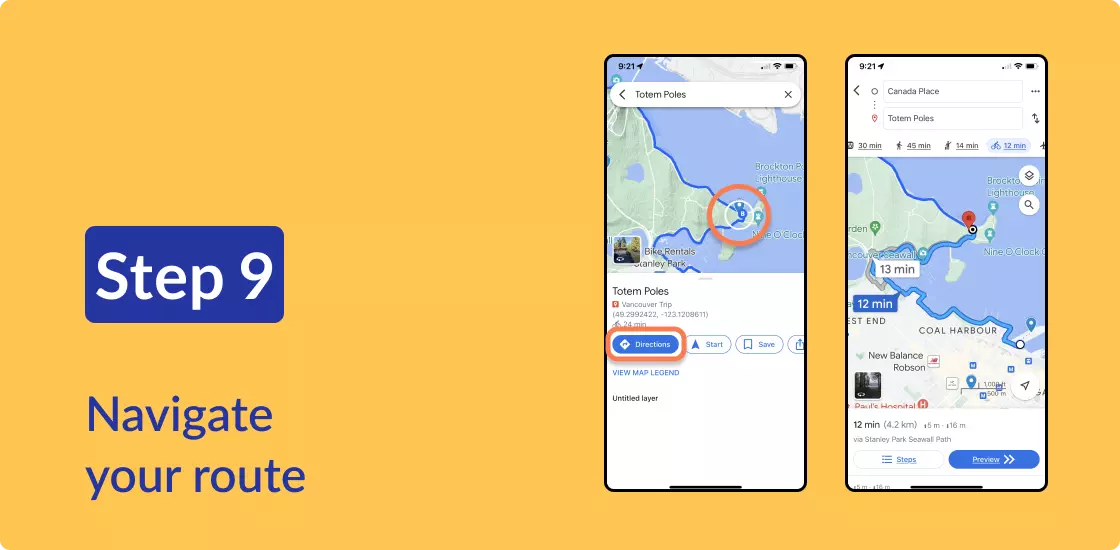
Unfortunately, this is where things get tricky. There’s no My Maps mobile app, so if you’ve created a route in My Maps you can’t just open it and start navigating in the same way you’d use a Google Maps route. There’s an easy workaround, though. When you get to your starting point, just open your map, click on the next point you want to visit, then click on Directions — and your route will be mapped out for you with all the usual Google Maps features. Just repeat this step at every stop.
10: (Advanced) Customize your Google route planner

In the example above we created two layers, one for each different mode of transport. You can do a lot more with layers, though. For example, you could create a layer with the places you want to visit each day, or group different kinds of places together in layers. You can easily drag and drop places between up to 10 layers to help keep your plans organized.
My Maps also gives you the ability to add more information to your places, including color codes and notes.
To add extra information to a place, just click on it and then on one of the icons along the bottom. Here we’ve added a custom icon and color to identify this as a place to eat, and also created a layer that contains all the parks we want to visit.

Frequently Asked Questions
Is there an app for mapping a route?
With Google Maps you can map a route with up to 10 stops for free. If you need a longer route or have specific needs — for example if you want to map a hiking, running or cycling route, a delivery route or a trucking route, you will probably need a more specialized app.
Can I plan a route with unlimited stops in Google Maps?
The longest route you can plan in Google Maps is 10 stops. If you need a larger number of stops, your best bet is to use a free trial of a route planning app like Routific.

Google Maps Route Planner For Deliveries
How To Optimize Multi-Stop Routes With Google Maps (2024)
